| Posted By |
Message |
LMF123
My Boys.....

Member since 4/07 1526 total posts
Name:
Lisa
|
Photoshop Q
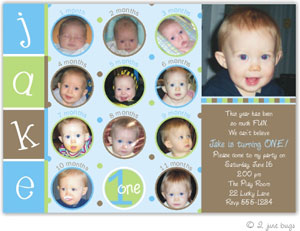
I am making my son's first BD invite and i want to have little circles (each with his face in it) on the invite, one representing each month! I have been using the elliptical marquee tool to surround him, then i delete the background. When i move him onto the invite, the white background comes with and prevents me from moving the little circles together (the white backgrounds overlap and i lose part of the picture). Should i do something with the lasso instead?
Also, how can i put a colored circle around each picture to kind of "frame" them?
Here's the look i am going for....
ETA: Thanks for your help! Image Attachment(s):

Message edited 1/29/2008 12:14:59 PM.
|
Posted 1/29/08 12:14 PM  |
| |
|
Long Island Weddings
Long Island's Largest Bridal Resource |
Smileyd17
kids

Member since 5/05 20997 total posts
Name:
Mommy
|
Re: Photoshop Q
You got the right idea:
Repost from Parenting....
Answer is that the photo needs to be Moved forward so it overlaps the circle marque.
Go to Arrange and bring forward.
|
Posted 1/29/08 12:24 PM  |
| |
|
nrthshgrl
It goes fast. Pay attention.

Member since 7/05 57538 total posts
Name:
|
Re: Photoshop Q
The easiest way I've found is to:
-Create a new layer on the photo you want to cut out.
- on the new layer, using the ellipitical marquee tool, create a circle that is over the part of the photo you want in the circle
- using the magic wand select. select the circle
- move to the layer with the photograph
-Ctrl + C or Copy command
- go to invite
- Ctrl + V or Paste command.
Hope that makes sense.
|
Posted 1/29/08 12:32 PM  |
| |
|
BabyAvocado
Happy New Year

Member since 5/05 17334 total posts
Name:
|
Re: Photoshop Q
Are you working in layers? You should be putting each picture on it's own layer so that you can adjust it as needed.
This is how I would do this:
1 - Use the ellipitcal marquee to select the face in the original pic
2 - Select Edit -> copy, and paste the pic into it's own layer on the invite
3 - To frame the circles use the Elliptical Tool (just below the Text (T) tool). Draw the ellipse over the pic to frame it, fill it in with the desired color, and then arrange the layers so the pic is in front of the ellipse.
GL!
|
Posted 1/29/08 12:36 PM  |
| |
|
NJmom
.
Member since 8/05 4987 total posts
Name:
|
Re: Photoshop Q
I do it a different way. For each picture make a new layer and create the circle with the marquee tool. Open the pic you want to put in the circle and copy it. Then go back to the layer with the circle and Edit->Paste Into. Then you can move the picture around to get it centered where you want. To change the size, go to Edit->Free Transform and then hold down the shift key while you drag the corner to resize. Hit enter when you're done.
To get a border around the picture go to Layer->Layer Style->Stroke. You can change the thickness and color of the border.
|
Posted 1/29/08 1:37 PM  |
| |
|
LMF123
My Boys.....

Member since 4/07 1526 total posts
Name:
Lisa
|
Re: Photoshop Q
Wow....thanks, ladies!! I will try all of your suggestions!!
|
Posted 1/29/08 3:40 PM  |
| |
|


